OAF Page Deployment Steps
This article will guide you towards the steps to follow OAF page deployment in Oracle Ebusiness Suite .
In following Steps , we will create a simple Lov Search Page and then migrate it in Ebusiness Suite .
1. Create a new Project under application and while creating Project Select Items as
"Workspace Configured Oracle Applications " ,


Click on Next to browser Jdbc file & Provide User Name and Password (Which should be of Oracle Applications) and also provide Application Short Name (SYSADMIN) & Responsibility Key(SYSTEM_ADMINISTRATOR)
Note: DBC file in R12.1.3 will be available in below path
$INST_TOP/appl/fnd/12.0.0/secure
Copy that file from server and put in dbc_files folder of Jdev folder. After placing the file in dbc folder of Jdev. Browse the file name under DBC_FILE_NAME section , Just like below.
Click on Finish after providing Valid Credentials, Applications and Responsibility Key.

Click on Project and Right click and Select Project Properties and then select ADF business Components and Create Application Module.

Provide the package name and AM name , in our case
Package : "xxnuc.oracle.apps.ak.lov.server"
Name : ListofValuesAM
After providing the above information click on Next.

Click on Next

Click on Finish

Once Application Module created , Next step is to create VO i,e.. View Object which will be responsible for fetching data from database. VO will be containing nested queries.
Just Right Click on the Project Properties and Click on New and Under that Select ADF Business Component click View Object

Select Package Name :" xxnuc.oracle.apps.ak.lov.server"
VO name : ListofValuesVO
Click Next


Shuttle back VO to the right side and Click Ok.

Now VO attached to AM , Next step is to create Page where Textfields ,Buttons will be accommodated.
To create a Page, Click on Web Tier under that Click OA Components in which select Page
section and then Click Ok.

Give Page Name like LovPG and Give package name as
"xxnuc.oracle.apps.ak.lov.webui"

LOVPG.xml will be created , click on region1
Put below values in each column of Region1

Go to the PageLayoutRN and click on New and create a Region with name MainRN as Region Style with MessageComponentLayout
To create a Region, Click on Web Tier under that Click OA Components in which select Region section and then Click Ok.


Go to Region Properties , select Scope as Public

Click on Region Structure "CustomerRN"

Right Click on CustomerRN and select New and then table using Wizard


Swap Attributes to the the Right side


Click on Next to Finish it


With these Lov Region has been created. Now next step is to create an LOV and attach this region to the LOV.
Now next step is to create Lov. Click on MainRN and right Click on New and select messageLovInput

item1 will be created with Item Style messageLovInput. To this item1 attach external Lov
"/xxnuc/oracle/apps/ak/lov/webui/CustomerRN"

Right Click on item1 and select lovmap and select below properties as

Now LOV page has been created , Final step is to deploy it in Oracle Applications. Zip the file from jdev to deploy pages into server.
Go to the Jdev/Myclasses folder and from there go to the folder xxnuc/oracle/apps/ak , there will be a folder name called lov which contains java classes and Xml files. zip lov files and migrate those files to the server in your user directory lets say /usr/tmp
After placing this zip file in /usr/tmp directory , the next step is to unzip it in destination folder.
Before unzipping it , Destination folder needs to be create under $JAVA_TOP/classes directory folder structure should be of same as of default package of Project (xxnuc.oracle.apps.ak), Below steps will guide you to create Destination Folder structure.
After executing unzipping command , Directory structure will be created and with these all files with type classes and xml will be deployed into the server
Once files unzipped , Paths will be created with the references to the structures. All class files and Xml will available in its respective folder.
Page and Region xml files needs to be imported into MDS directory.
Which can be done through below steps
Go to below path
$JAVA_TOP/classes/xxnuc/oracle/apps/ak/lov
and run below command for page & region respectively
If above command successfully imported then message will display "Import Completed" .
OAF page has been deployed , now it needs to attach to the specific responsibility to access it and for that we need to register a form function.
Create Form Function
Function Name : CUST_LOV
User Function Name : XXNUC_CUST_LOV

Go to the Properties and put type as SSWA jsp function

Click on WebHTML and give the path in HTML Call
OA.jsp?page=/xxnuc/oracle/apps/ak/lov/webui/CustomerLovPG


This article will guide you towards the steps to follow OAF page deployment in Oracle Ebusiness Suite .
In following Steps , we will create a simple Lov Search Page and then migrate it in Ebusiness Suite .
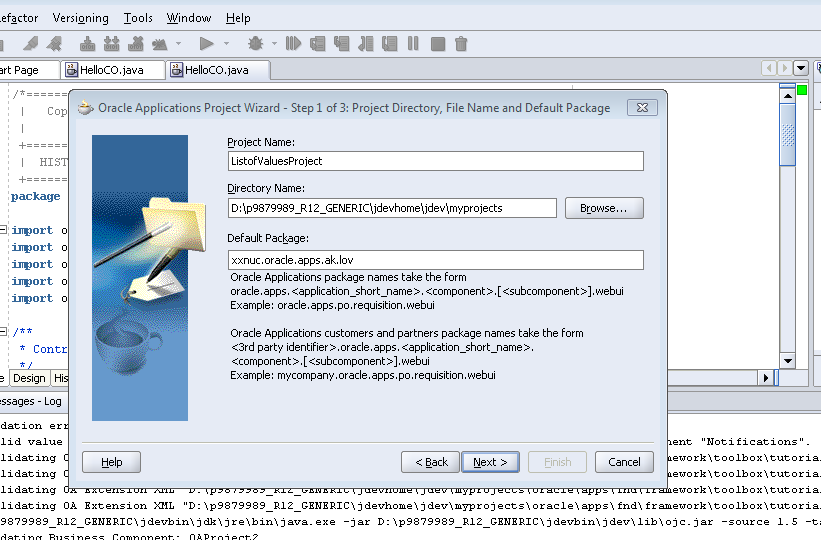
1. Create a new Project under application and while creating Project Select Items as
"Workspace Configured Oracle Applications " ,

Provide the Project Name and Click on "Ok"

After providing Project Name , another Wizard appears which asks you to enter the default package.
Remember whatever structure we going to provide in Default package , the same structure needs to be created as a path under $JAVA_TOP/classes directory in server.
In our case we are structuring out default package as
"xxnuc.oracle.apps.ak.lov"
Based on the above structure , same path needs to be created in the Application Server.
after specifying default package and then Click on Next

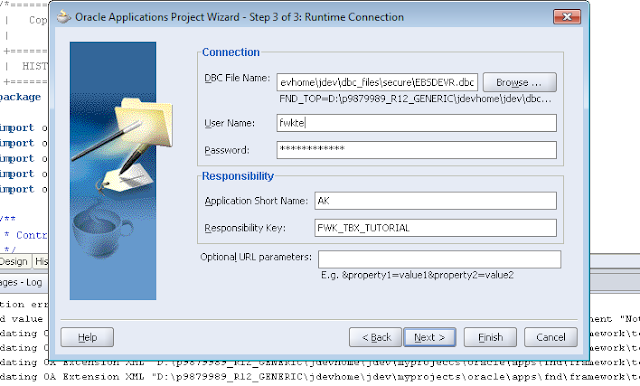
Click on Next to browser Jdbc file & Provide User Name and Password (Which should be of Oracle Applications) and also provide Application Short Name (SYSADMIN) & Responsibility Key(SYSTEM_ADMINISTRATOR)
Note: DBC file in R12.1.3 will be available in below path
$INST_TOP/appl/fnd/12.0.0/secure
Copy that file from server and put in dbc_files folder of Jdev folder. After placing the file in dbc folder of Jdev. Browse the file name under DBC_FILE_NAME section , Just like below.

Click on Finish after providing Valid Credentials, Applications and Responsibility Key.

Create Application Module
Click on Project and Right click and Select Project Properties and then select ADF business Components and Create Application Module.

Provide the package name and AM name , in our case
Package : "xxnuc.oracle.apps.ak.lov.server"
Name : ListofValuesAM
After providing the above information click on Next.
Click on Next

Click on Finish

Once Application Module created , Next step is to create VO i,e.. View Object which will be responsible for fetching data from database. VO will be containing nested queries.
Just Right Click on the Project Properties and Click on New and Under that Select ADF Business Component click View Object

Select Package Name :" xxnuc.oracle.apps.ak.lov.server"
VO name : ListofValuesVO
Click Next

Write below query in query statement
SELECT PARTY_NAME,ACCOUNT_NUMBER
FROM HZ_PARTIES HP , HZ_CUST_ACCOUNTS HCA
WHERE HP.PARTY_ID=HCA.PARTY_ID

Click on Next

Click on Finish

Attach newly created VO to the AM
Click on ListofValuesAM

Shuttle back VO to the right side and Click Ok.

Now VO attached to AM , Next step is to create Page where Textfields ,Buttons will be accommodated.
To create a Page, Click on Web Tier under that Click OA Components in which select Page
section and then Click Ok.

Give Page Name like LovPG and Give package name as
"xxnuc.oracle.apps.ak.lov.webui"

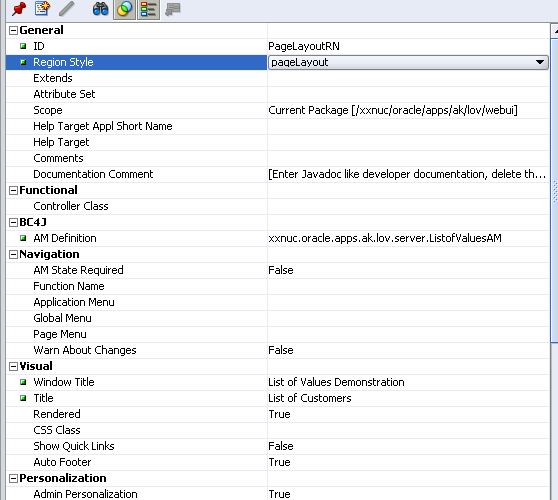
LOVPG.xml will be created , click on region1
Put below values in each column of Region1
ID
|
PageLayoutRN
|
Region Style
|
pagelayout
|
AM Definition
|
xxnuc.oracle.apps.ak.lov.server.ListofValuesAM
|
Window Title
|
List of Values Demonstration
|
Title
|
List of Customers
|
Go to the PageLayoutRN and click on New and create a Region with name MainRN as Region Style with MessageComponentLayout
Once Page has been created successfully , Next step is to create Region .

Provide Name as "CustomerRN"
Package as "xxnuc.oracle.apps.ak.lov.webui"
Style as "ListOfValues"

Go to Region Properties , select Scope as Public

Click on Region Structure "CustomerRN"
e

Right Click on CustomerRN and select New and then table using Wizard

Select the VO (ListofValuesVO1 ) and click on Next

Select Below properties
Region ID
|
ListofValuesVO1
|
Region Style
|
table
|

Swap Attributes to the the Right side
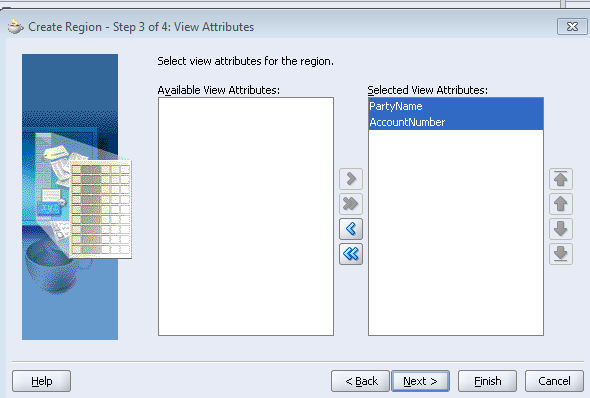
Select style as messageStyleText

Click on Next to Finish it

After finishing it , Click on PartyName Attribute Properties and Set Search Allowed to True and Selective Search Criteria to True

With these Lov Region has been created. Now next step is to create an LOV and attach this region to the LOV.
Now next step is to create Lov. Click on MainRN and right Click on New and select messageLovInput

item1 will be created with Item Style messageLovInput. To this item1 attach external Lov
"/xxnuc/oracle/apps/ak/lov/webui/CustomerRN"

Right Click on item1 and select lovmap and select below properties as
LOV Region Item
|
PartyName
|
Return Item
|
item1
|
Criteria Item
|
item1
|

Now LOV page has been created , Final step is to deploy it in Oracle Applications. Zip the file from jdev to deploy pages into server.
Go to the Jdev/Myclasses folder and from there go to the folder xxnuc/oracle/apps/ak , there will be a folder name called lov which contains java classes and Xml files. zip lov files and migrate those files to the server in your user directory lets say /usr/tmp
After placing this zip file in /usr/tmp directory , the next step is to unzip it in destination folder.
Before unzipping it , Destination folder needs to be create under $JAVA_TOP/classes directory folder structure should be of same as of default package of Project (xxnuc.oracle.apps.ak), Below steps will guide you to create Destination Folder structure.
Write Below commands
cd $JAVA_TOP/classes
mkdir xxnuc
cd xxnuc
mkdir oracle
cd oracle
mkdir apps
cd apps
mkdir ak
cd ak
Once destination Folder structure has been created , Move the zip file from /usr/tmp to destination folder which is nothing but $JAVA_TOP/xxnuc/oracle/apps/ak/.
After successfully transferring ZIP files to destination directory .
Go to the destination directory and unzip the files by below command
unzip -o $JAVA_TOP/xxnuc/oracle/apps/ak/lov.zip
After executing unzipping command , Directory structure will be created and with these all files with type classes and xml will be deployed into the server
Once files unzipped , Paths will be created with the references to the structures. All class files and Xml will available in its respective folder.
Page and Region xml files needs to be imported into MDS directory.
Which can be done through below steps
Go to below path
$JAVA_TOP/classes/xxnuc/oracle/apps/ak/lov
and run below command for page & region respectively
java oracle.jrad.tools.xml.importer.XMLImporter $JAVA_TOP /xxnuc/oracle/apps/ak/lov/webui/CustomerLovPG.xml -username apps -password apps -dbconnection "(DESCRIPTION=(ADDRESS=(PROTOCOL=tcp)(HOST= <name of HOST>)(PORT=<port_number>))(CONNECT_DATA=(SID=<SID_NAME>)))"
java oracle.jrad.tools.xml.importer.XMLImporter $JAVA_TOP /xxnuc/oracle/apps/ak/lov/webui/CustomerRN.xml -username apps -password apps -dbconnection "(DESCRIPTION=(ADDRESS=(PROTOCOL=tcp)(HOST= <name of HOST>)(PORT=<port_number>))(CONNECT_DATA=(SID=<SID_NAME>)))"
OAF page has been deployed , now it needs to attach to the specific responsibility to access it and for that we need to register a form function.
Create Form Function
Function Name : CUST_LOV
User Function Name : XXNUC_CUST_LOV

Go to the Properties and put type as SSWA jsp function

Click on WebHTML and give the path in HTML Call
OA.jsp?page=/xxnuc/oracle/apps/ak/lov/webui/CustomerLovPG

Attach the Form Function to appropriate Menu of your Responsibility and then access the Form. If OA page doesn't appear even after adding then bounce the apache server and try to access the page.


2 Comments
başakşehir
ReplyDeletebayrampaşa
beşiktaş
beykoz
beylikdüzü
PK6S
mecidiyeköy
ReplyDeletesakarya
istanbul
kayseri
ordu
S5LTMU