This article explains about the concepts of Cascading lov in ADF . Cascading LOV is the most common requirement in ADF we come across, But i haven't found single blog which had listed out the detailed steps to create Cascaded LOV , in this post i will going to cover each and every step of Cascaded LOV creation process.
Before we begin the process LOV creation process, I would like to create some database tables , relationship between this tables and Insert some data into tables. Below link contain scripts to create database tables and insert data into tables.
https://drive.google.com/file/d/0B7aSuIl4TDKJRk5VNmdvdW1xamc/view?usp=sharing
Once we are done with the process , then we can proceed further with Cascaded LOV creation Process.
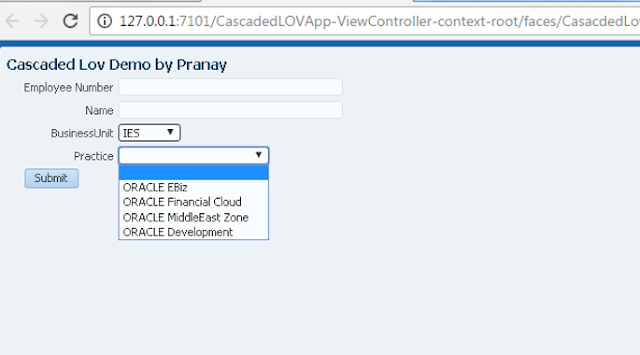
Before we begin i would like to show how page looks with cascading LOV .
Here "BusinessUnit" is Parent LOV , upon the selection of Parent LOV values , child LOV that is "Practice" values display relevant values with respect to Parent lov
So two View objecs one for Business unit and other for Practice will be created and Businessunit id will be passed as reference in Practice View Object to filter out values based on the Parent value selection
Now we will follow below steps to achieve it.
1. Create Applications à Fusion Web Application (ADF)

Application Name
|
CascadedLOVApp
|
Application Package Prefix
|
Demo.adf.CascadedLOVApp
|

3. Subsequently click on Next to Finish it

After Completion of Application Creation Process , The next process to create BC4J Components , like View Objects and Application Module
4. Create View Object by clicking on Model and then ADF Business Components

Provide Database Details to Connect to Database

Click on Ok to Provide VO object Name and its Package.
Package Name
|
Demo.adf.CascadedLOVApp.model.server
|
View Object Name
|
DualVO
|

Then further Next to Proceed to Provide Query
Below Query needs to be Pasted.
SELECT '' EMPLOYE_ID,
''EMPLOYEE_NAME , '' BUSINESS_UNIT,'' PRACTICE FROM DUAL

Click on Each attribute VO to make it as "Updateable" to "Always"

Click on Next

And then click on Finish to Complete the Process

Creating BusinessUnitVO with below Nomenclature
Package Name
|
Demo.adf.CascadedLOVApp.model.server
|
View Object Name
|
BusinessUnitVO
|

Write following query to Provide View Object Query
SELECT
BUSINESS_UNIT_ID,BUSINESS_UNIT_NAME FROM XX_BUSINESS_UNITS

and then click on Subsequent Next Button to finish the BusinessUnitVO creation Process
Create Another ViewObject with a name PracticeVO
Package Name
|
Demo.adf.CascadedLOVApp.model.server
|
View Object Name
|
PracticeVO
|

Create view object query with below query
SELECT * FROM
XX_PRACTICE_UNITS

Click on Next to Provide Bind Parameter with Name "BindBusinessId"

And click on Add View Criteria to provide Condition as shown in below screenshot.

3. After Creation of ViewObject , the very next step is to create Application Module with below nomenclature
Package Name
|
Demo.adf.CascadedLOVApp.model.services
|
ApplicationModule Name
|
CascadedLOVAM
|

Click Next and also click on next to generate CascadeLovAmImpl

Click Next to Finish the Application Module Creation Process

After creating Application Module , now next step is to Associate View Objects which we have just created to Application Module
Double Click à CascadedLOVAM
Shuttle Available View Objects to Data Model Side as shown in below image

Now Business Component creation has been completed.
4. Creation of Cascaded LOV
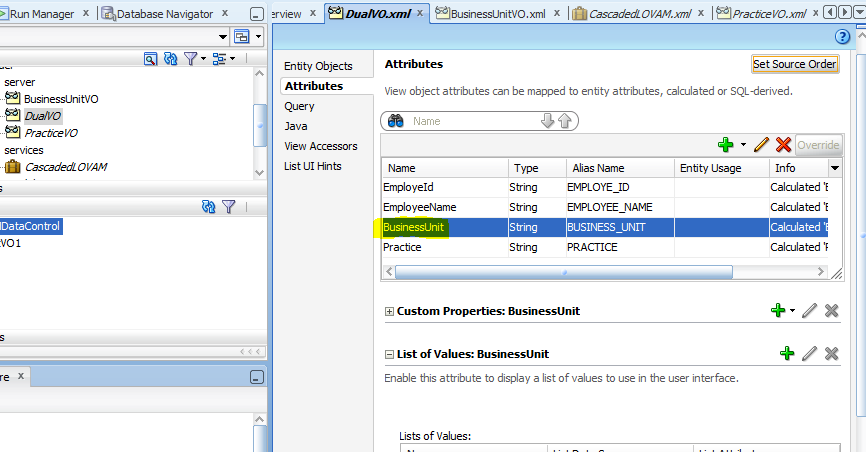
Its time to create a Cascaded LOV , So here we are going to use DualVO attributes for cascading attributes. Attributes BusinessUnit will be made to work as Parent Lov and Practice will be used to make it works as Child Lov.
Below steps will be used to implement to Cascaded LOV.
Double Click à DualVO à Attributes àBusinessUnit

Click on Green Plus Sign and Shuttle BusinessUnitVO to left Side

Select List Attribute "BusinessUnitId" , this List attribute will hold the values and passed as parameter
as in Child LOV query .

Display Attributes selected as "BusinessUnitName" which will display Business Unit Names if we provide " BusinessUnitId" then Business unit ids will be shown in List of Values

Click on Ok to Finish it

Lets Create Child LOV by following above process.
Double Click à DualVO à Attributes àPractice


Select Display Attribute as "PracticeName"

Click OK to Finish the Process.
5. View Accessors to Provide View criteria
View Accessors will pass relevant Attribute value to View Criteria to execute the query. So in simple words View Accessors is responsible to fetch Child Lov Values based on the Parent LOV values .
In our Case BusinessUnit is Parent LOV and which need to passed as input to ChildLOV query and which in turns fetch correct values for ChildLOV Practice.
You need to Consider "BusinessUnit" and that needs to be passed as view criteria in Practice Lov
Double Click àDualVO àView Accessors
Shuttle the
PracticeVOCriteria to left and Provide
Value “BusinessUnit”

The value BusinessUnit is nothing but Parent LOV which Holds BusinessUnitId Values.
Run Application Module to verify , whether Cascaded LOV functionality working fine or not.

You can select values from Parent LOV (Business Unit) to check Child Lov values (Practice)

Create a page by following below steps
Double Click à ViewControlleràJSFà
JSF Page

Provide Page name "CasacdedLovPG.jspx" and choose appropriate Template like i did below

Drop Panel Header and change its name to "Cascaded Lov Demo by Pranay" and Insider Demo Panel Header drop Panel Group Layout

Drop DualVO1 from DataControls to Panel Group Layout as a ADF form

Check the Checkbox for Submit Button


Select BusinessUnit Value and verify Practice attribute Values , it should appear like its appearing in below screen.


0 Comments